Créer automatiquement des images avec Make (ex Integromat)
Créer automatiquement des images avec Make (ex Integromat)
Nous avons tous parfois l'impression de perdre du temps à faire les mêmes actions, encore et encore... Pensez à tout le temps supplémentaire que vous auriez si vous supprimiez ces tâches répétitives de votre vie professionnelle quotidienne. Heureusement pour nous, il existe des outils incroyables pour nous aider à automatiser certaines de ces tâches !
Dans cet article, notre objectif sera d'automatiser la création d'images grâce à Abyssale & Integromat.
Cela vous permettra de gagner un temps précieux si vous :
- Créez régulièrement du contenu sur réseaux sociaux
- Promouvoir régulièrement vos nouveaux produits ou contenus
- Lancer régulièrement des offres ou des transactions saisonnières sur plusieurs canaux de commercialisation.
Exigences préliminaires :
- Avoir un compte Abyssale
- Avoir un compte Integromat
- Choisissez où envoyer vos images générées
Pour ce tutoriel, nous allons utiliser un cas d'utilisation imaginaire afin de vous donner une vision plus concrète de l'objectif de cette automatisation créative.
Dans ce tutoriel, notre objectif est de pouvoir partager automatiquement chaque nouvel article publié sur notre blog sur notre réseaux sociaux. Ici nous allons prendre l'exemple d'Instagram et cela nous donne le scénario suivant : chaque fois qu'un nouvel article est publié sur notre blog, un post instagram est automatiquement créé pour le promouvoir et inviter nos followers à le lire.
#1 Design et préparez votre template
La première étape consiste à créer votre template sur Abyssale. Pour ce faire, il vous suffit de vous connecter à votre compte et de cliquer sur "Créer un nouveau template". Si vous souhaitez créer votre propre site à partir de zéro, il vous suffit de cliquer sur "Créer à partir de zéro".Créer à partir de zéro". Si vous souhaitez utiliser l'un de nos templates pré-fabriqués comme base ou un précédent template que vous avez conçu, cliquez sur "Browse templates".
Il est important de nommer votre template correctement pour les étapes ultérieures de ce tutoriel d'automatisation. Ensuite, il est temps de design votre template ! Dans notre exemple, l'image générée doit inviter nos followers à lire nos derniers articles sur notre blog. Design votre image en fonction de votre objectif. Si vous ne savez pas par où commencer, consultez nos 5 conseils pour améliorer vos designs ici.
Pendant ce temps, vous devrez faire deux choses importantes :
- Ajoutez le bon format à votre template
- Nommez vos couchescorrectement
#1.1 Ajouter des formats à votre Abyssale template
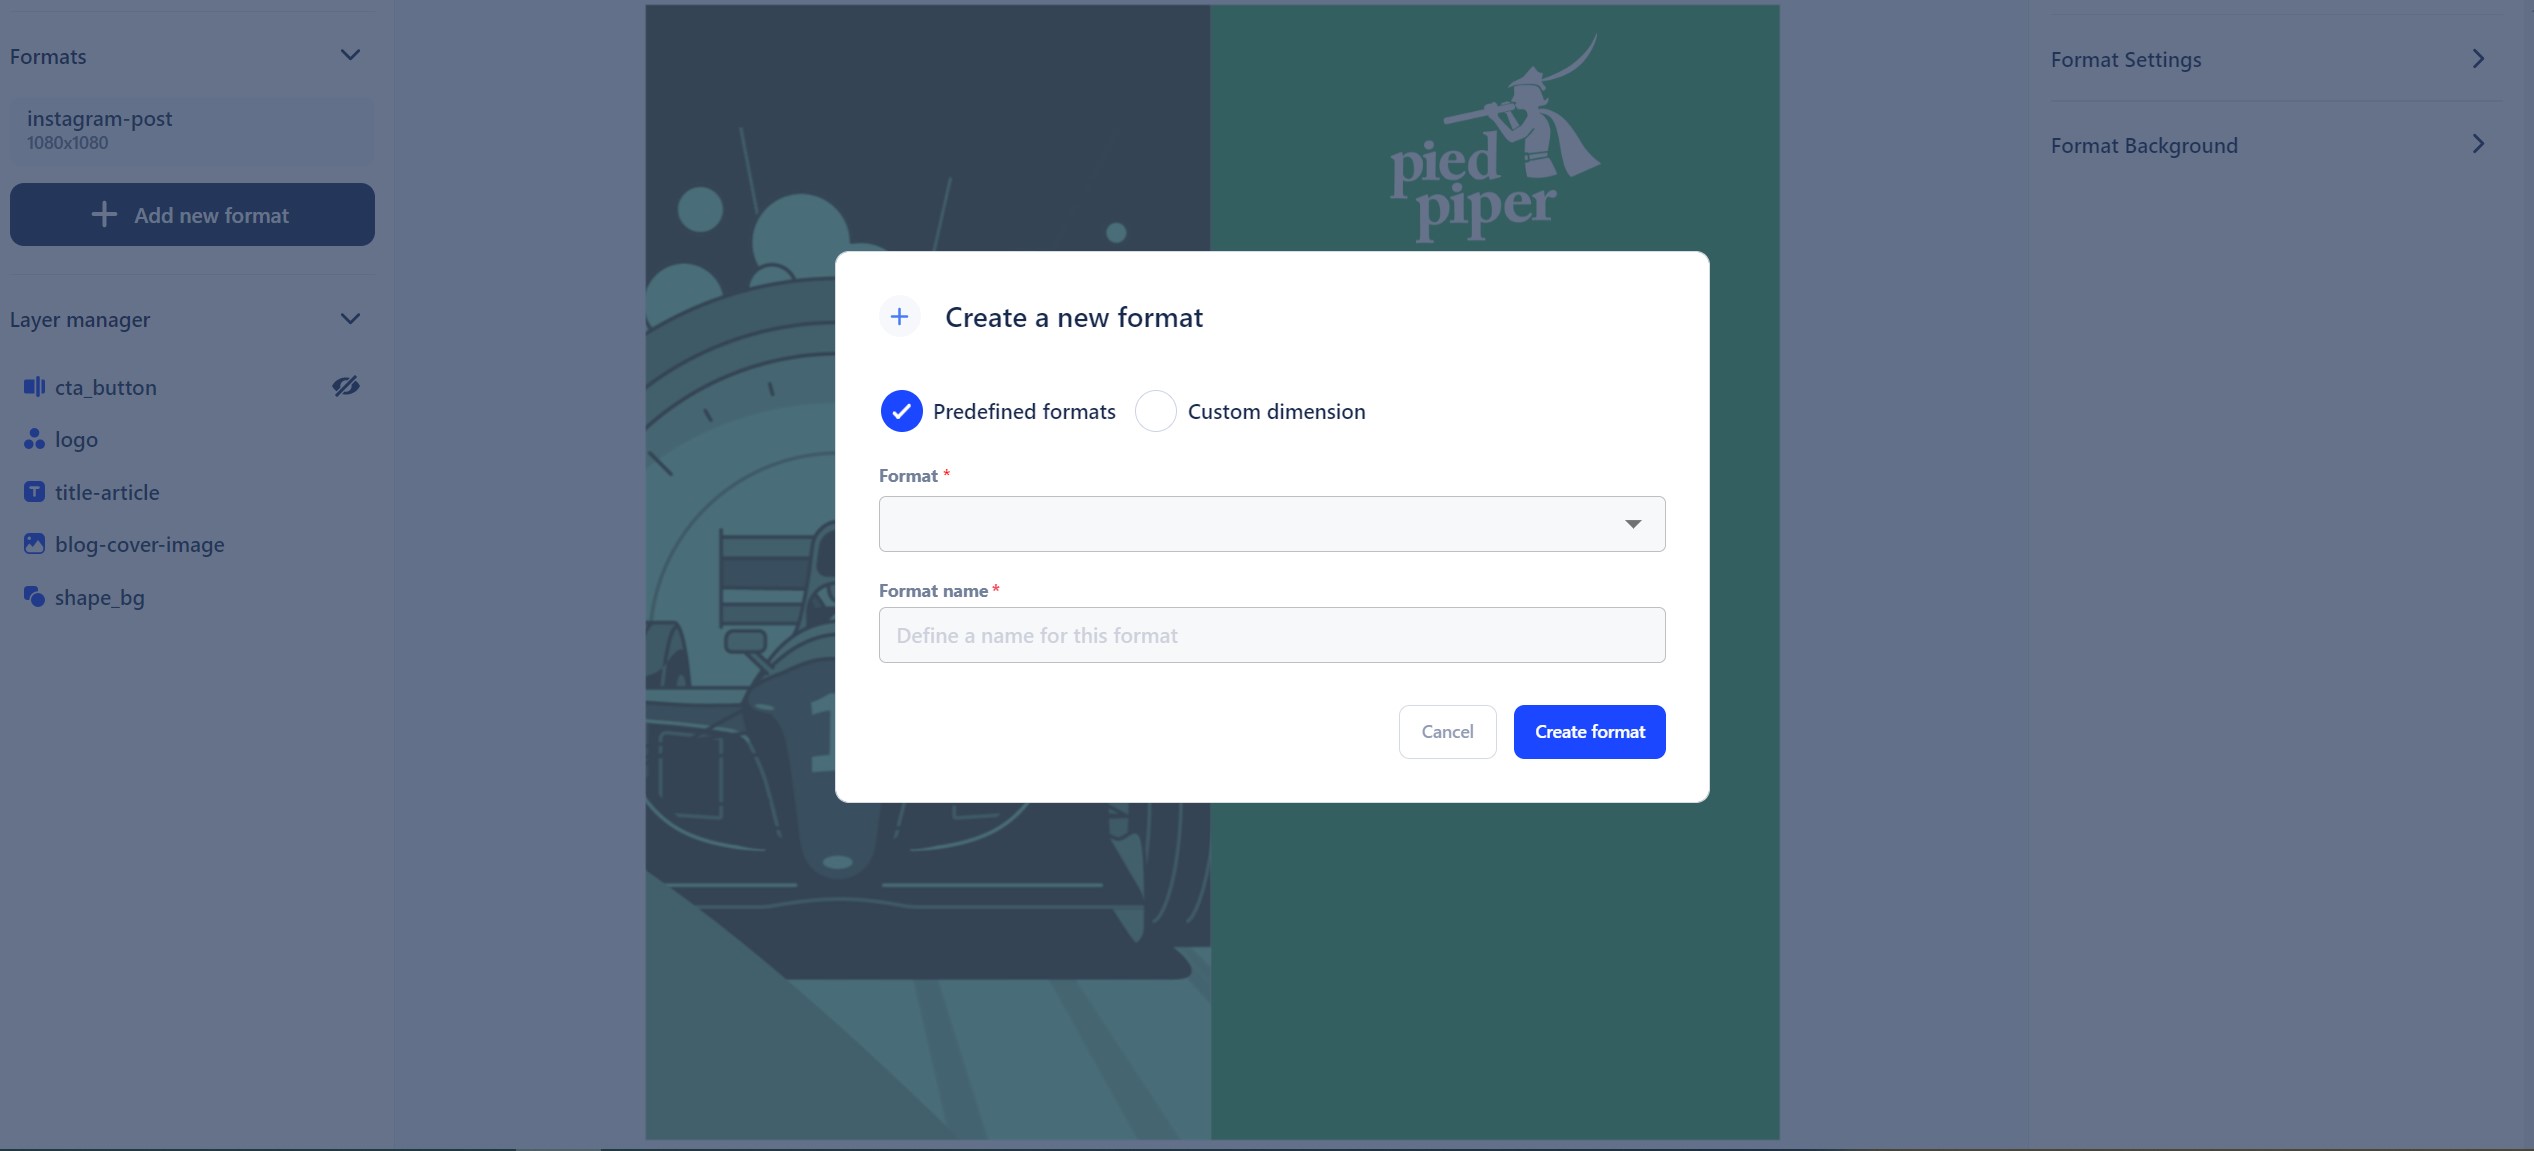
Lorsque vous choisissez un site template, vous pouvez sélectionner les formats déjà disponibles. Toutefois, si vous avez besoin d'un autre format, cliquez sur "Ajouter un nouveau format" dans le générateur template .
Pour nous, il s'agira d'un format de post Instagram. Gardez à l'esprit que vous pouvez également ajouter autant de formats que vous le souhaitez en les sélectionnant parmi nos formats prédéfinis ou en créant un format personnalisé.
#1.2 Nommez vos couches template
Ceci est très important pour la partie automatisation d'Integromat (Make). Nommez vos calques en fonction de chaque élément de votre visuel, et surtout ceux qui vont changer en fonction de vos différentes images. Cela facilitera la mise en place de notre automatisation d'images Integromat.
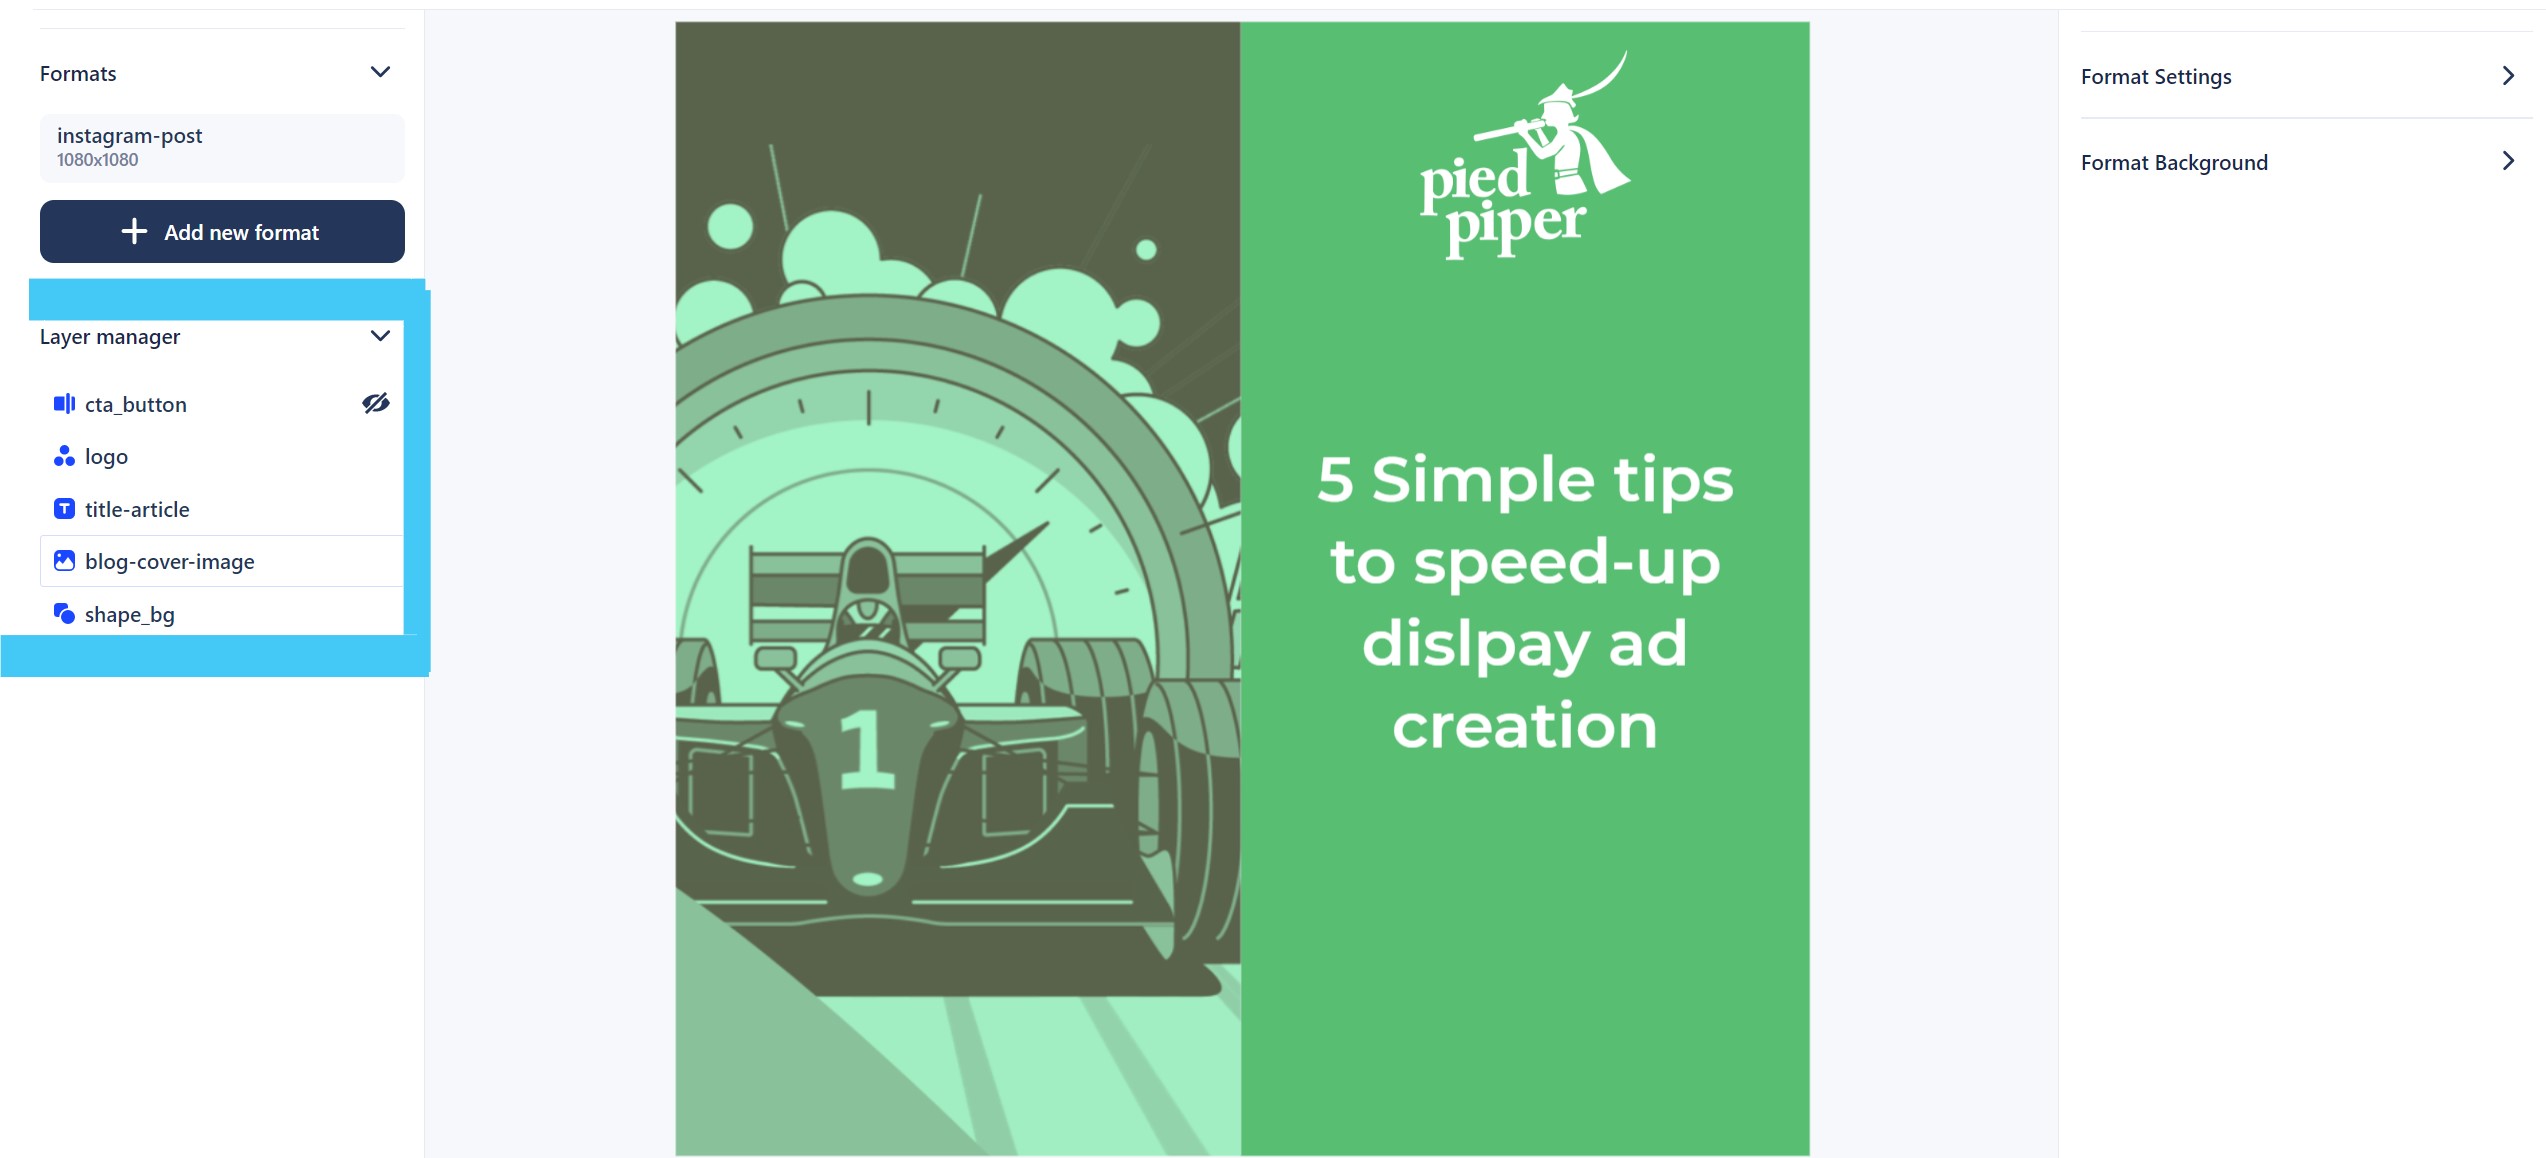
→ L'objectif principal ici est de créer un design template qui fonctionnera pour plusieurs types ou longueurs de contenu. Une fois que notre automatisation Integromat sera opérationnelle, seuls les éléments fournis à Abyssale par Integromat seront utilisés pour générer vos images. Ainsi, notre template doit être conçu dans cet esprit.
#2 Configurer l'automatisation de vos images avec Integromat
Connectez-vous à votre compte Integromat (Make) et créez un nouveau scénario.
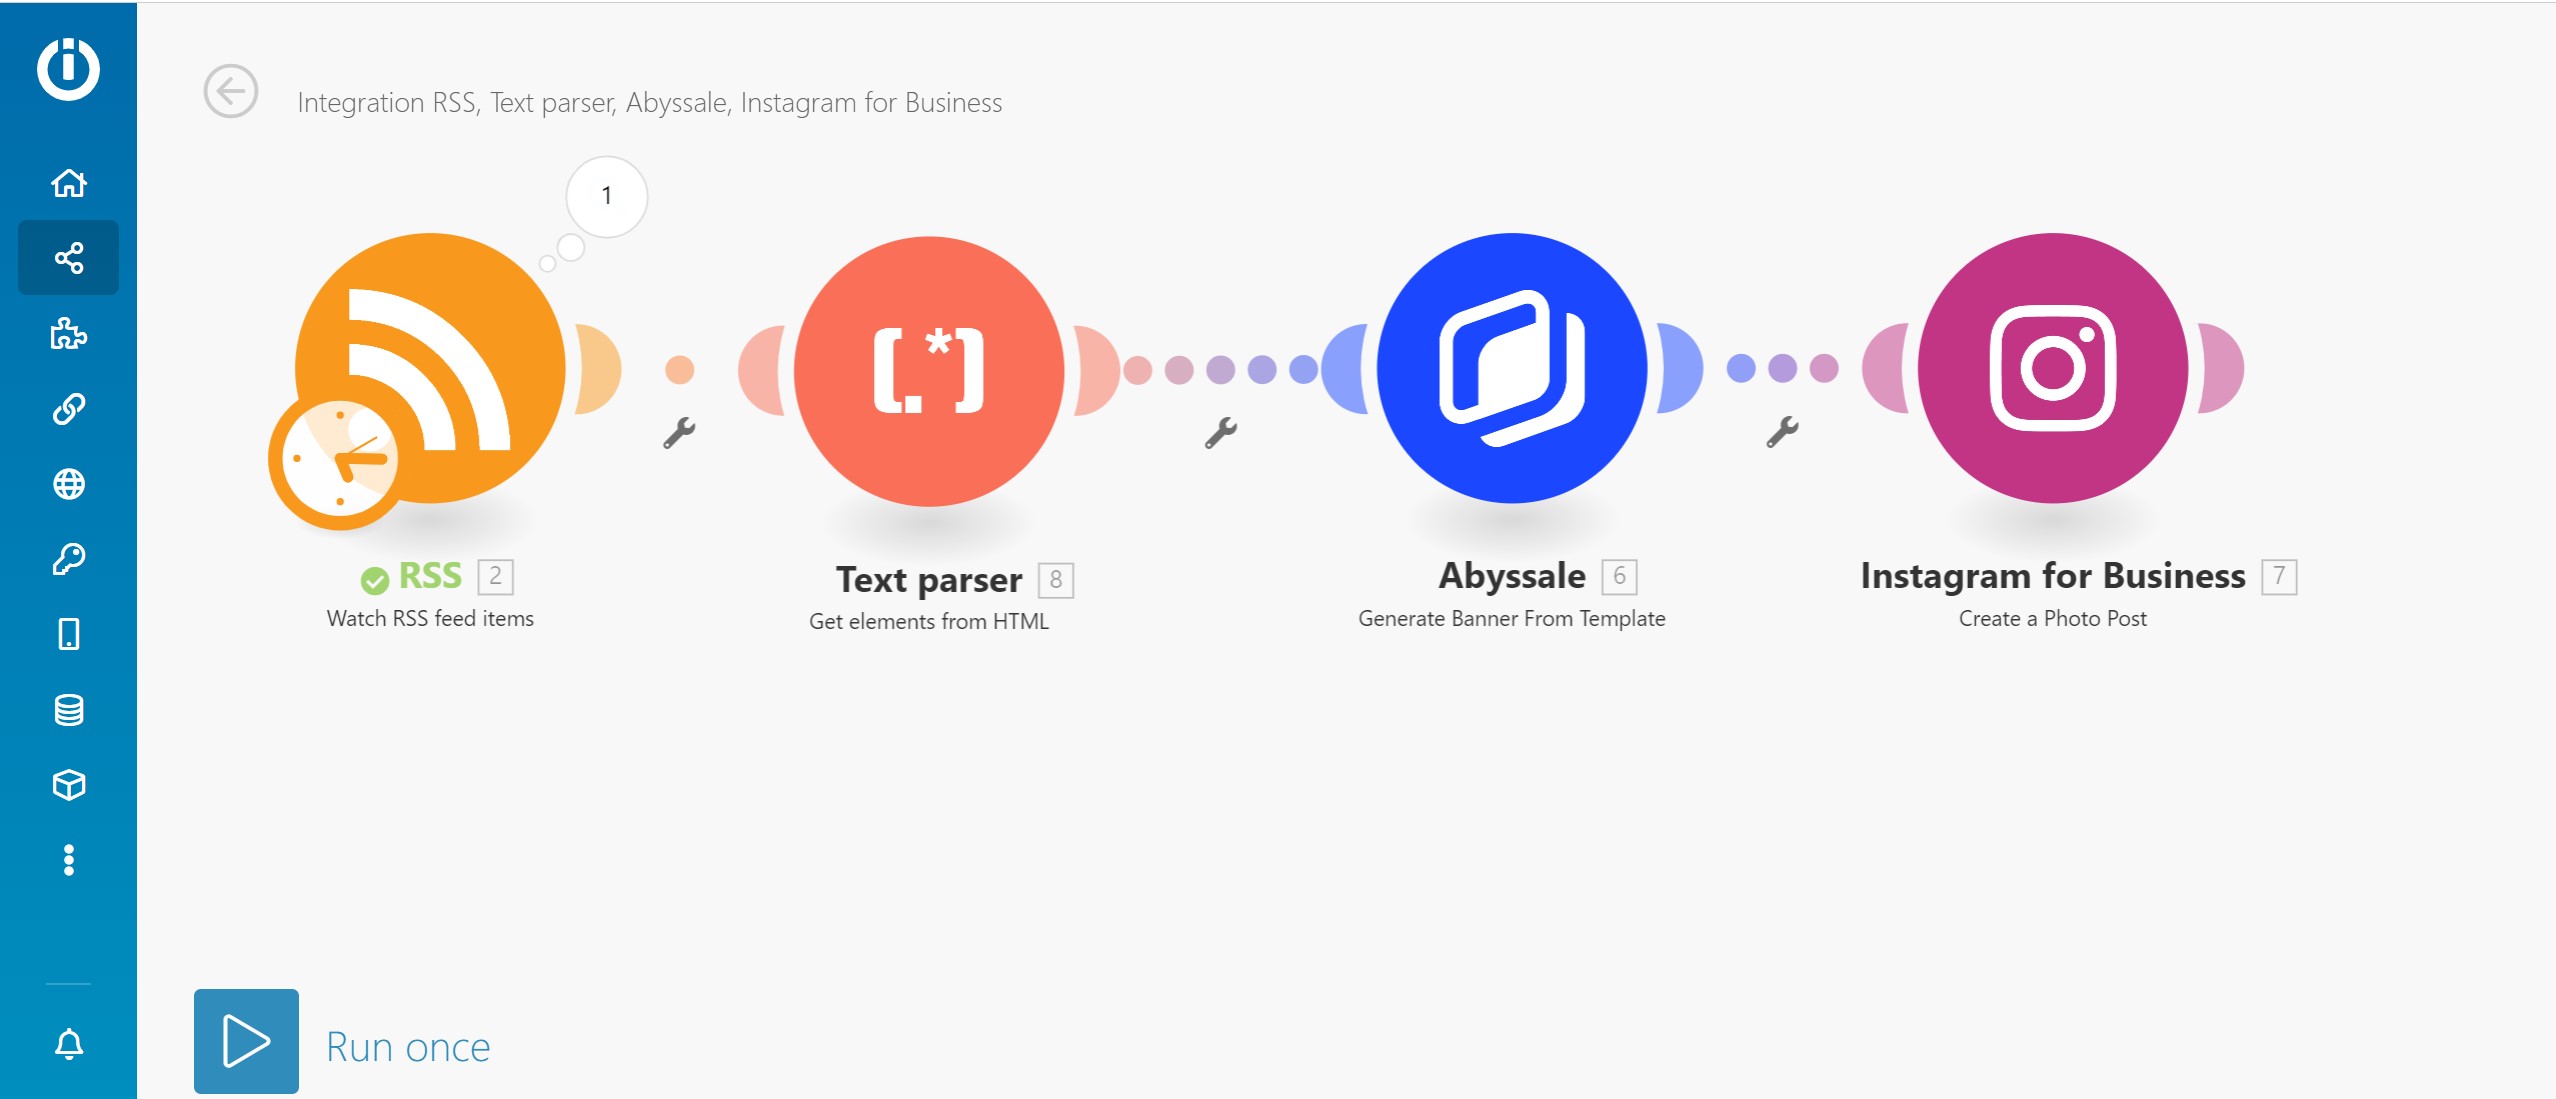
L'idée générale ici est de prendre toutes les informations du blog Abyssale , de générer des images, et de les envoyer sur instagram. Pour ce faire, nous utiliserons les 4 étapes suivantes :
- Récupération des données du flux RSS du blog Abyssale
- Utiliser un "analyseur de texte" afin d'identifier les zones dynamiques du texte et de récupérer le contenu lié à chaque article du blog.
- Envoyez ces données à Abyssale pour générer des images
- Prenez cette image et envoyez-la sur Instagram
Integromat fonctionne en utilisant un module différent pour chaque étape de votre automatisation, donc dans notre cas cela résultera en 4 modules différents.
#2.1 Ajouter le module RSS
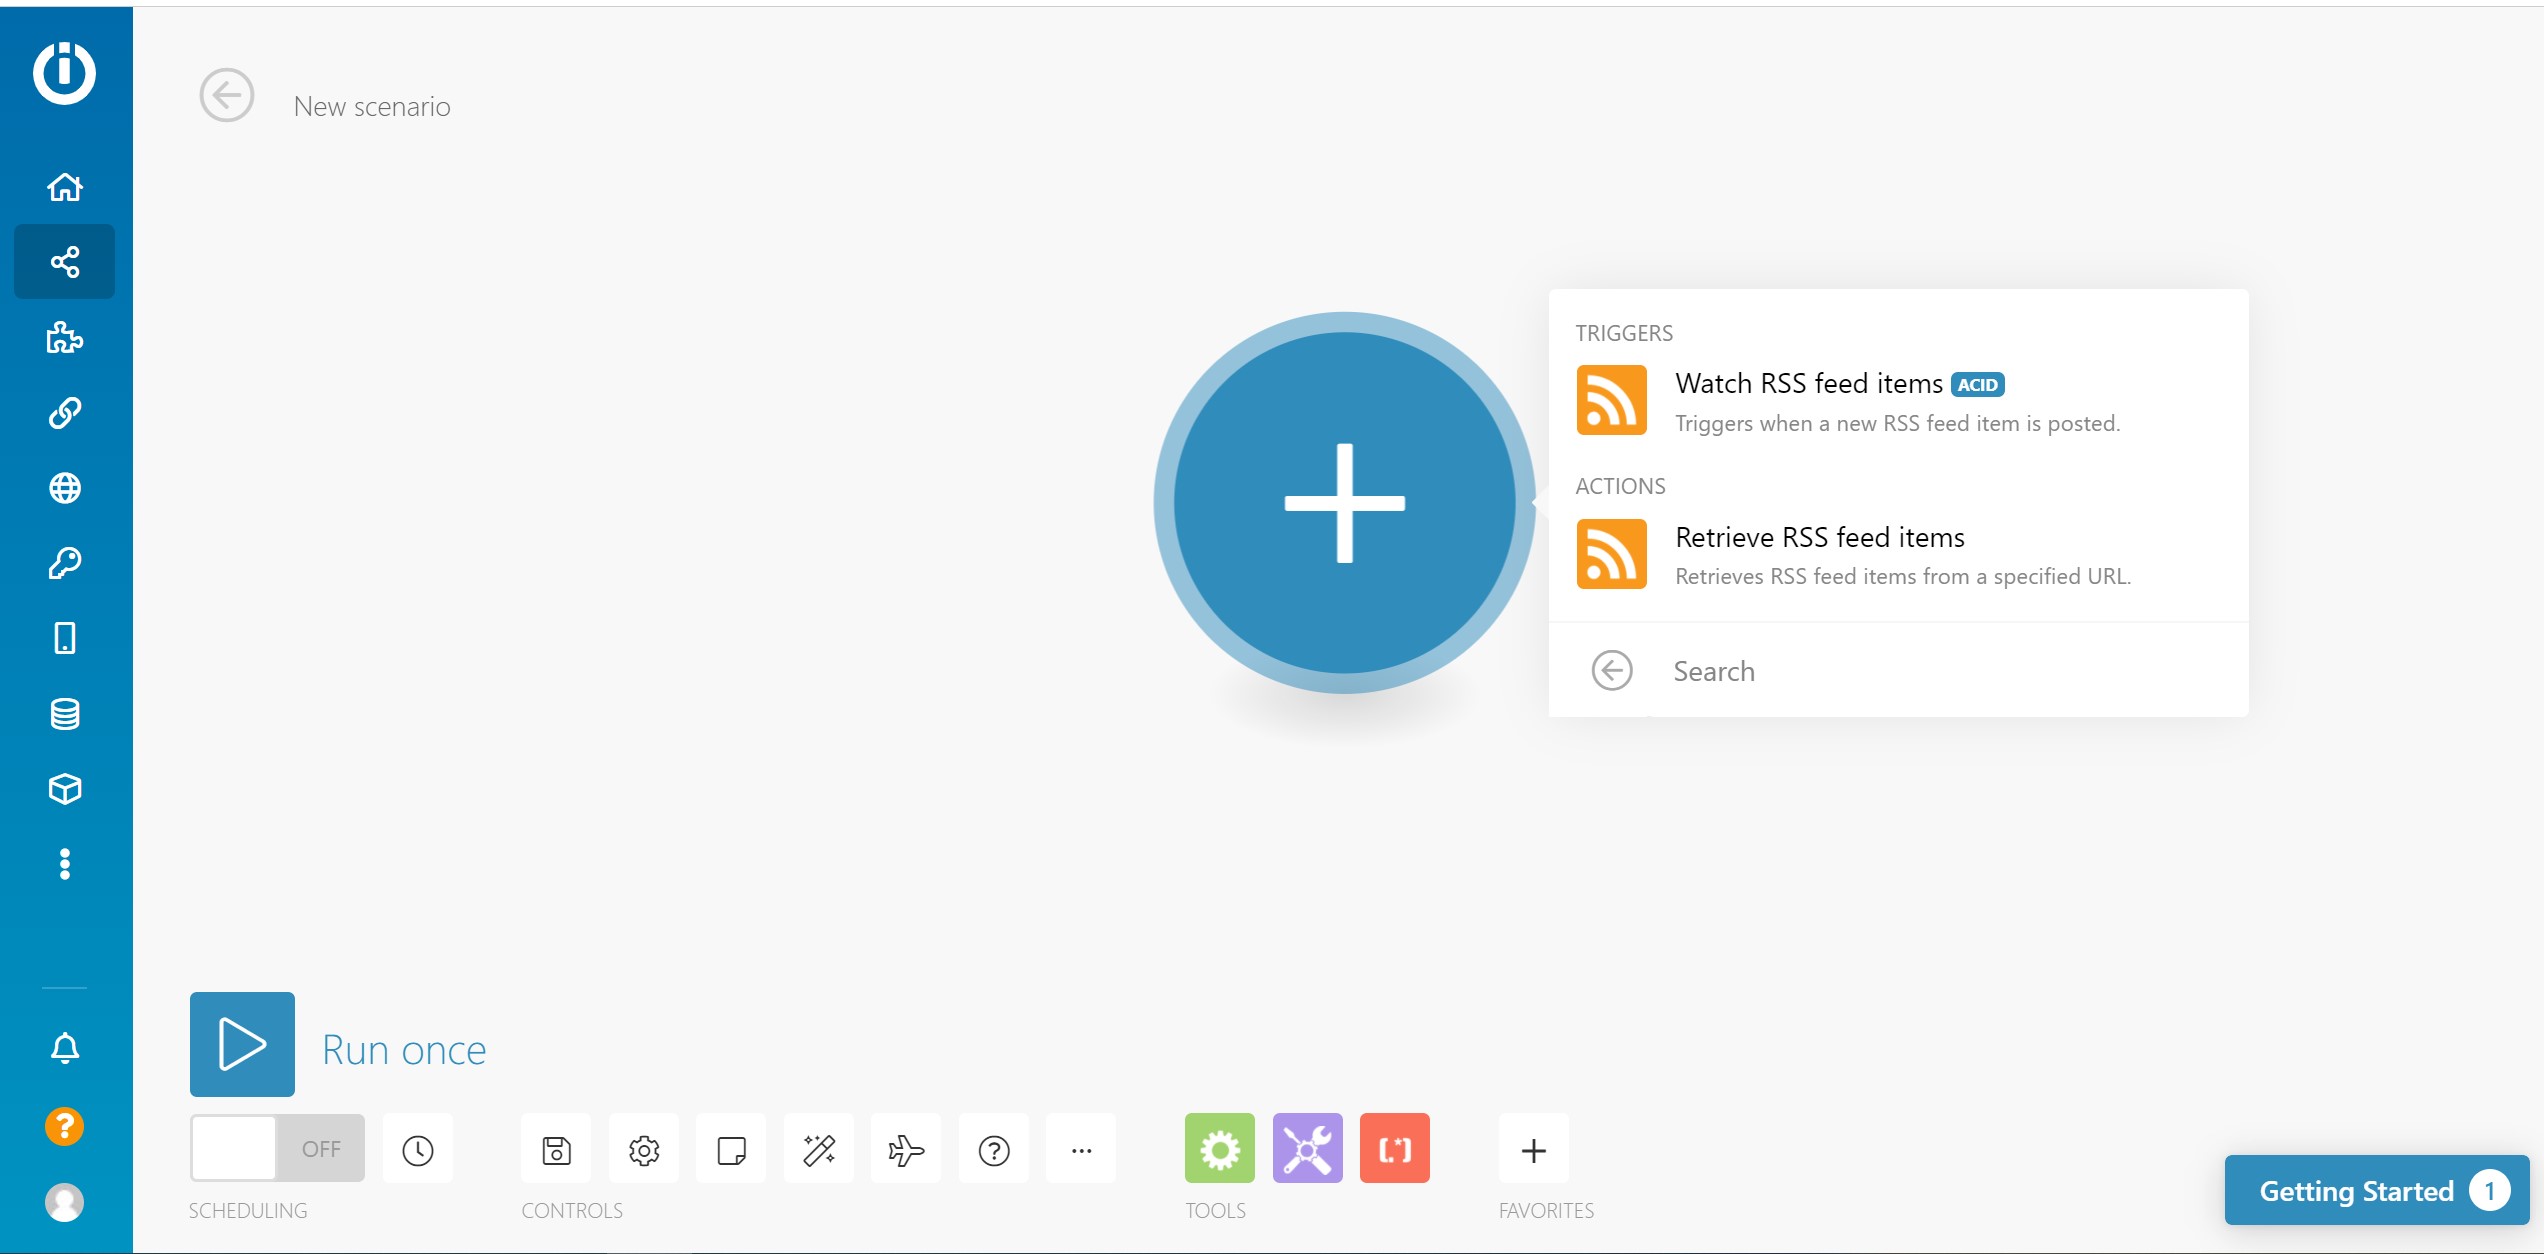
Cliquez sur le bouton + pour ajouter un nouveau module. Dans la liste, choisissez "RSS" puis cliquez sur "Watch RSS Feed items" pour créer un événement déclencheur. Cet événement analysera le flux RSS à un intervalle régulier pour rechercher les nouveaux éléments publiés.
Ensuite, vous devrez mettre le lien vers votre flux RSS dans la section URL et choisir un nombre maximum d'éléments à renvoyer chaque fois qu'Integromat trouve de nouveaux éléments. Réglez-le sur 1 pour être sûr que vous ne publierez pas plusieurs posts instagram à la fois.
Enfin, vous pouvez choisir le moment à partir duquel votre scénario commencera.
#2.2 Ajouter un module d'analyseur de texte
La deuxième étape consiste à ajouter un module "Text parser" à votre scénario et à choisir l'action "Get elements from HTML". Ce module va scanner le code contenu dans votre flux RSS et récupérer chaque élément composant chaque item (Titre, description, image...).
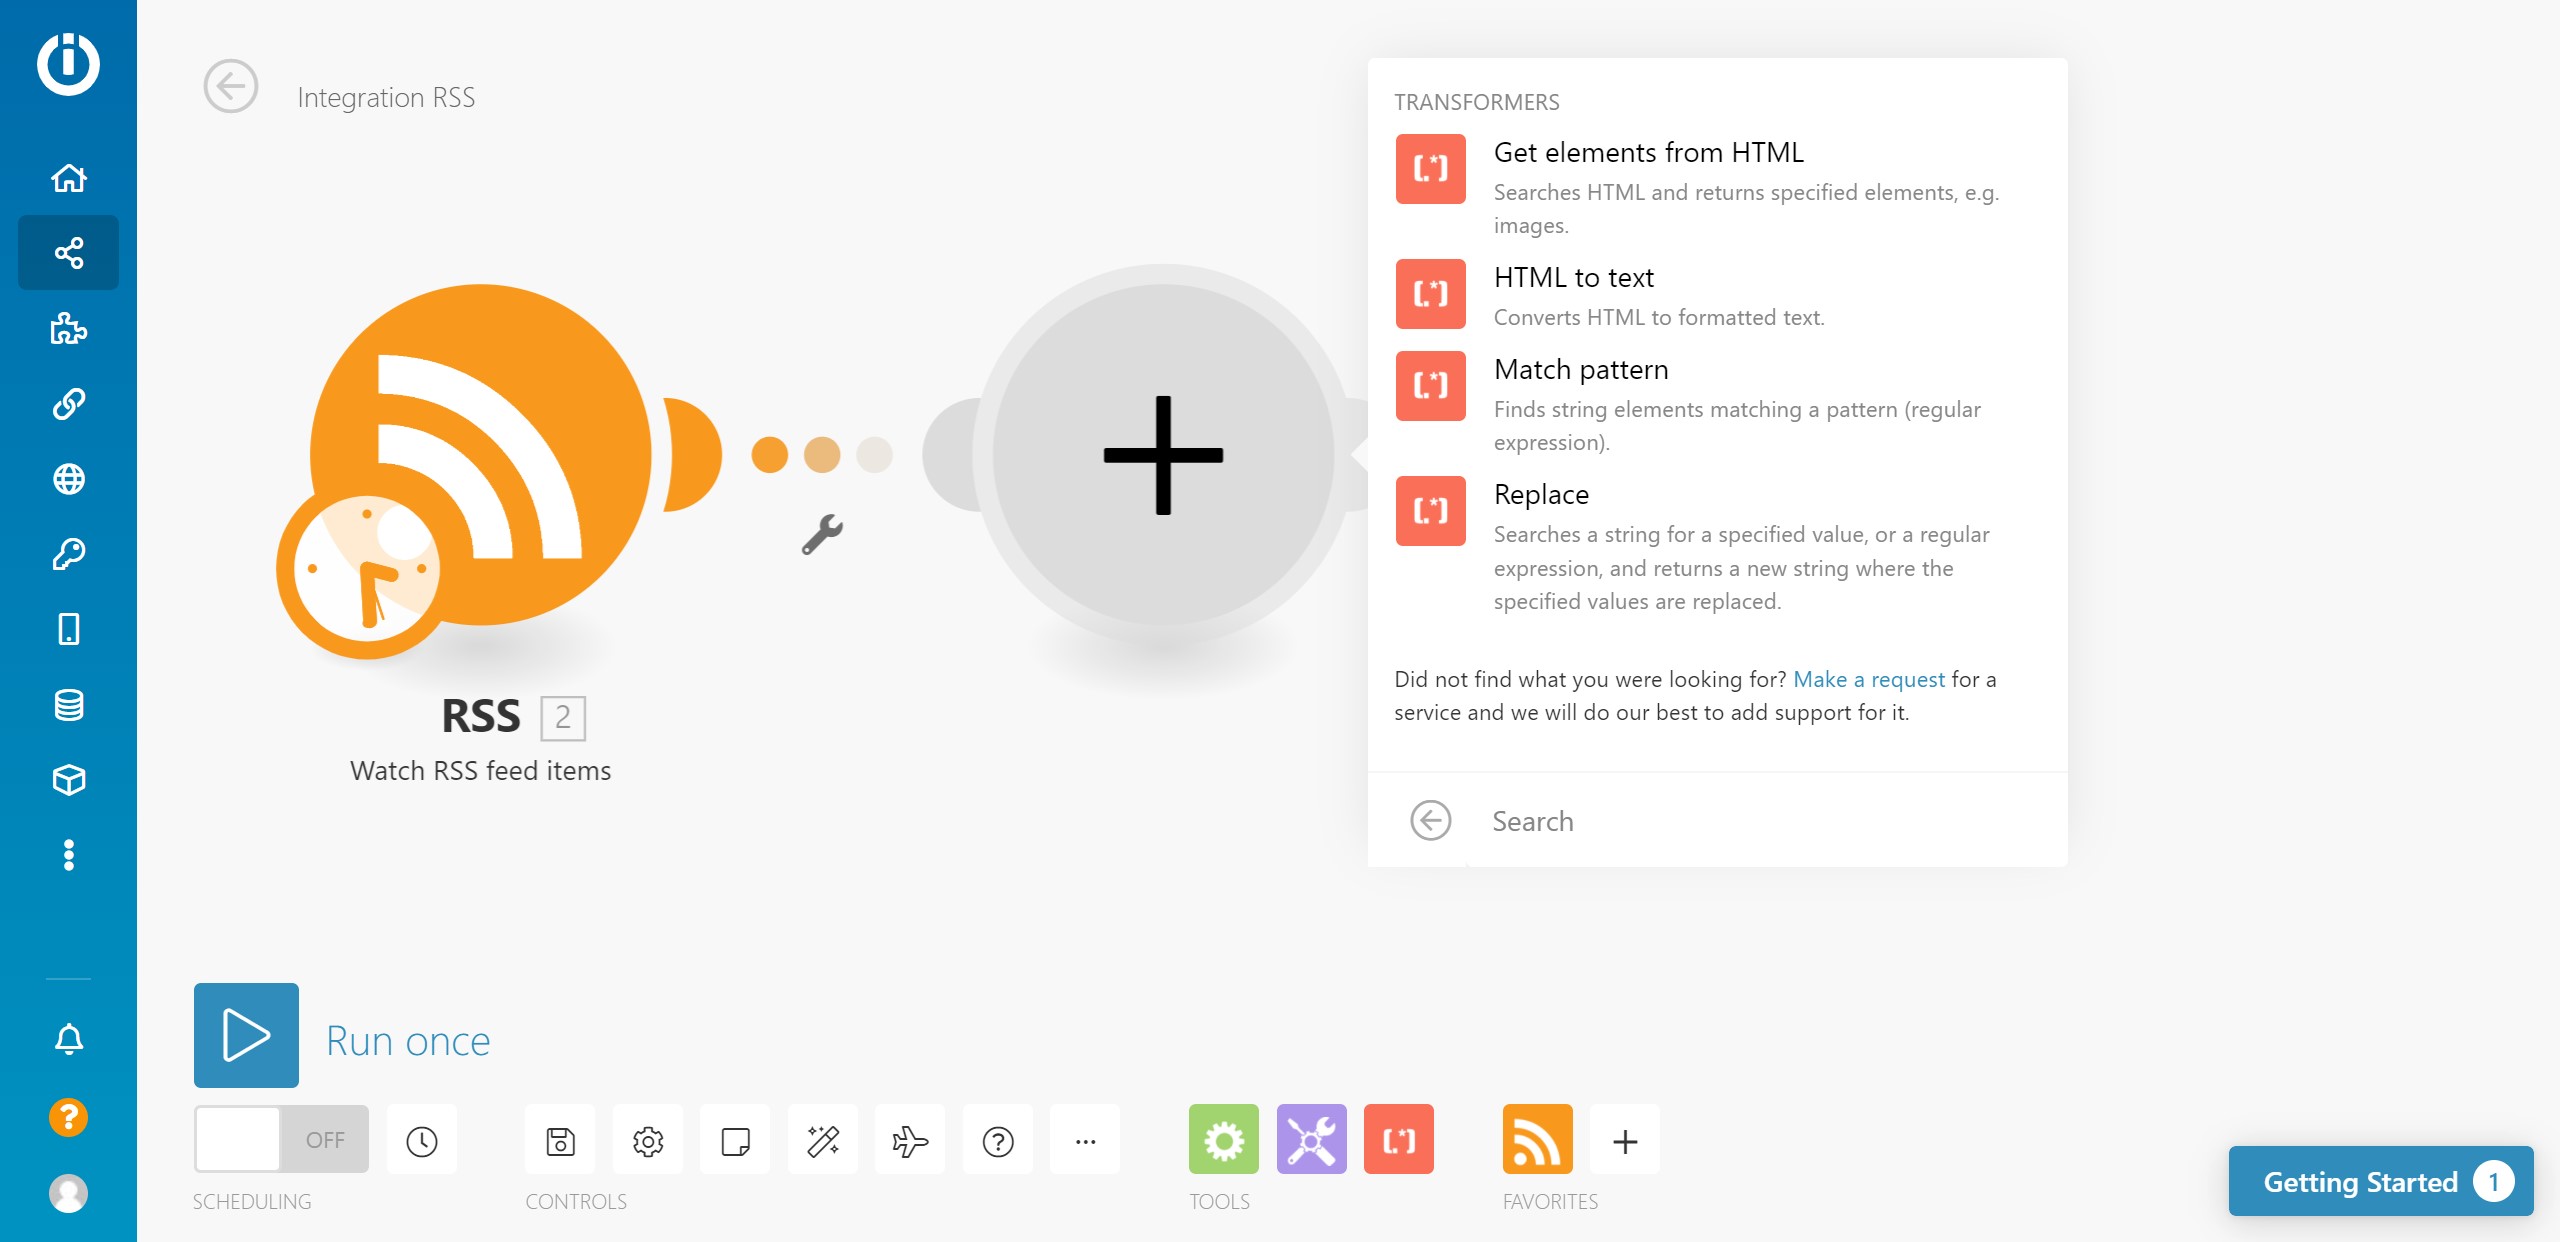
Dans notre cas, nous choisirons les éléments Image et title afin de répondre au cas d'utilisation de ce tutoriel.
#2.3 Générer des images avec le module Abyssale
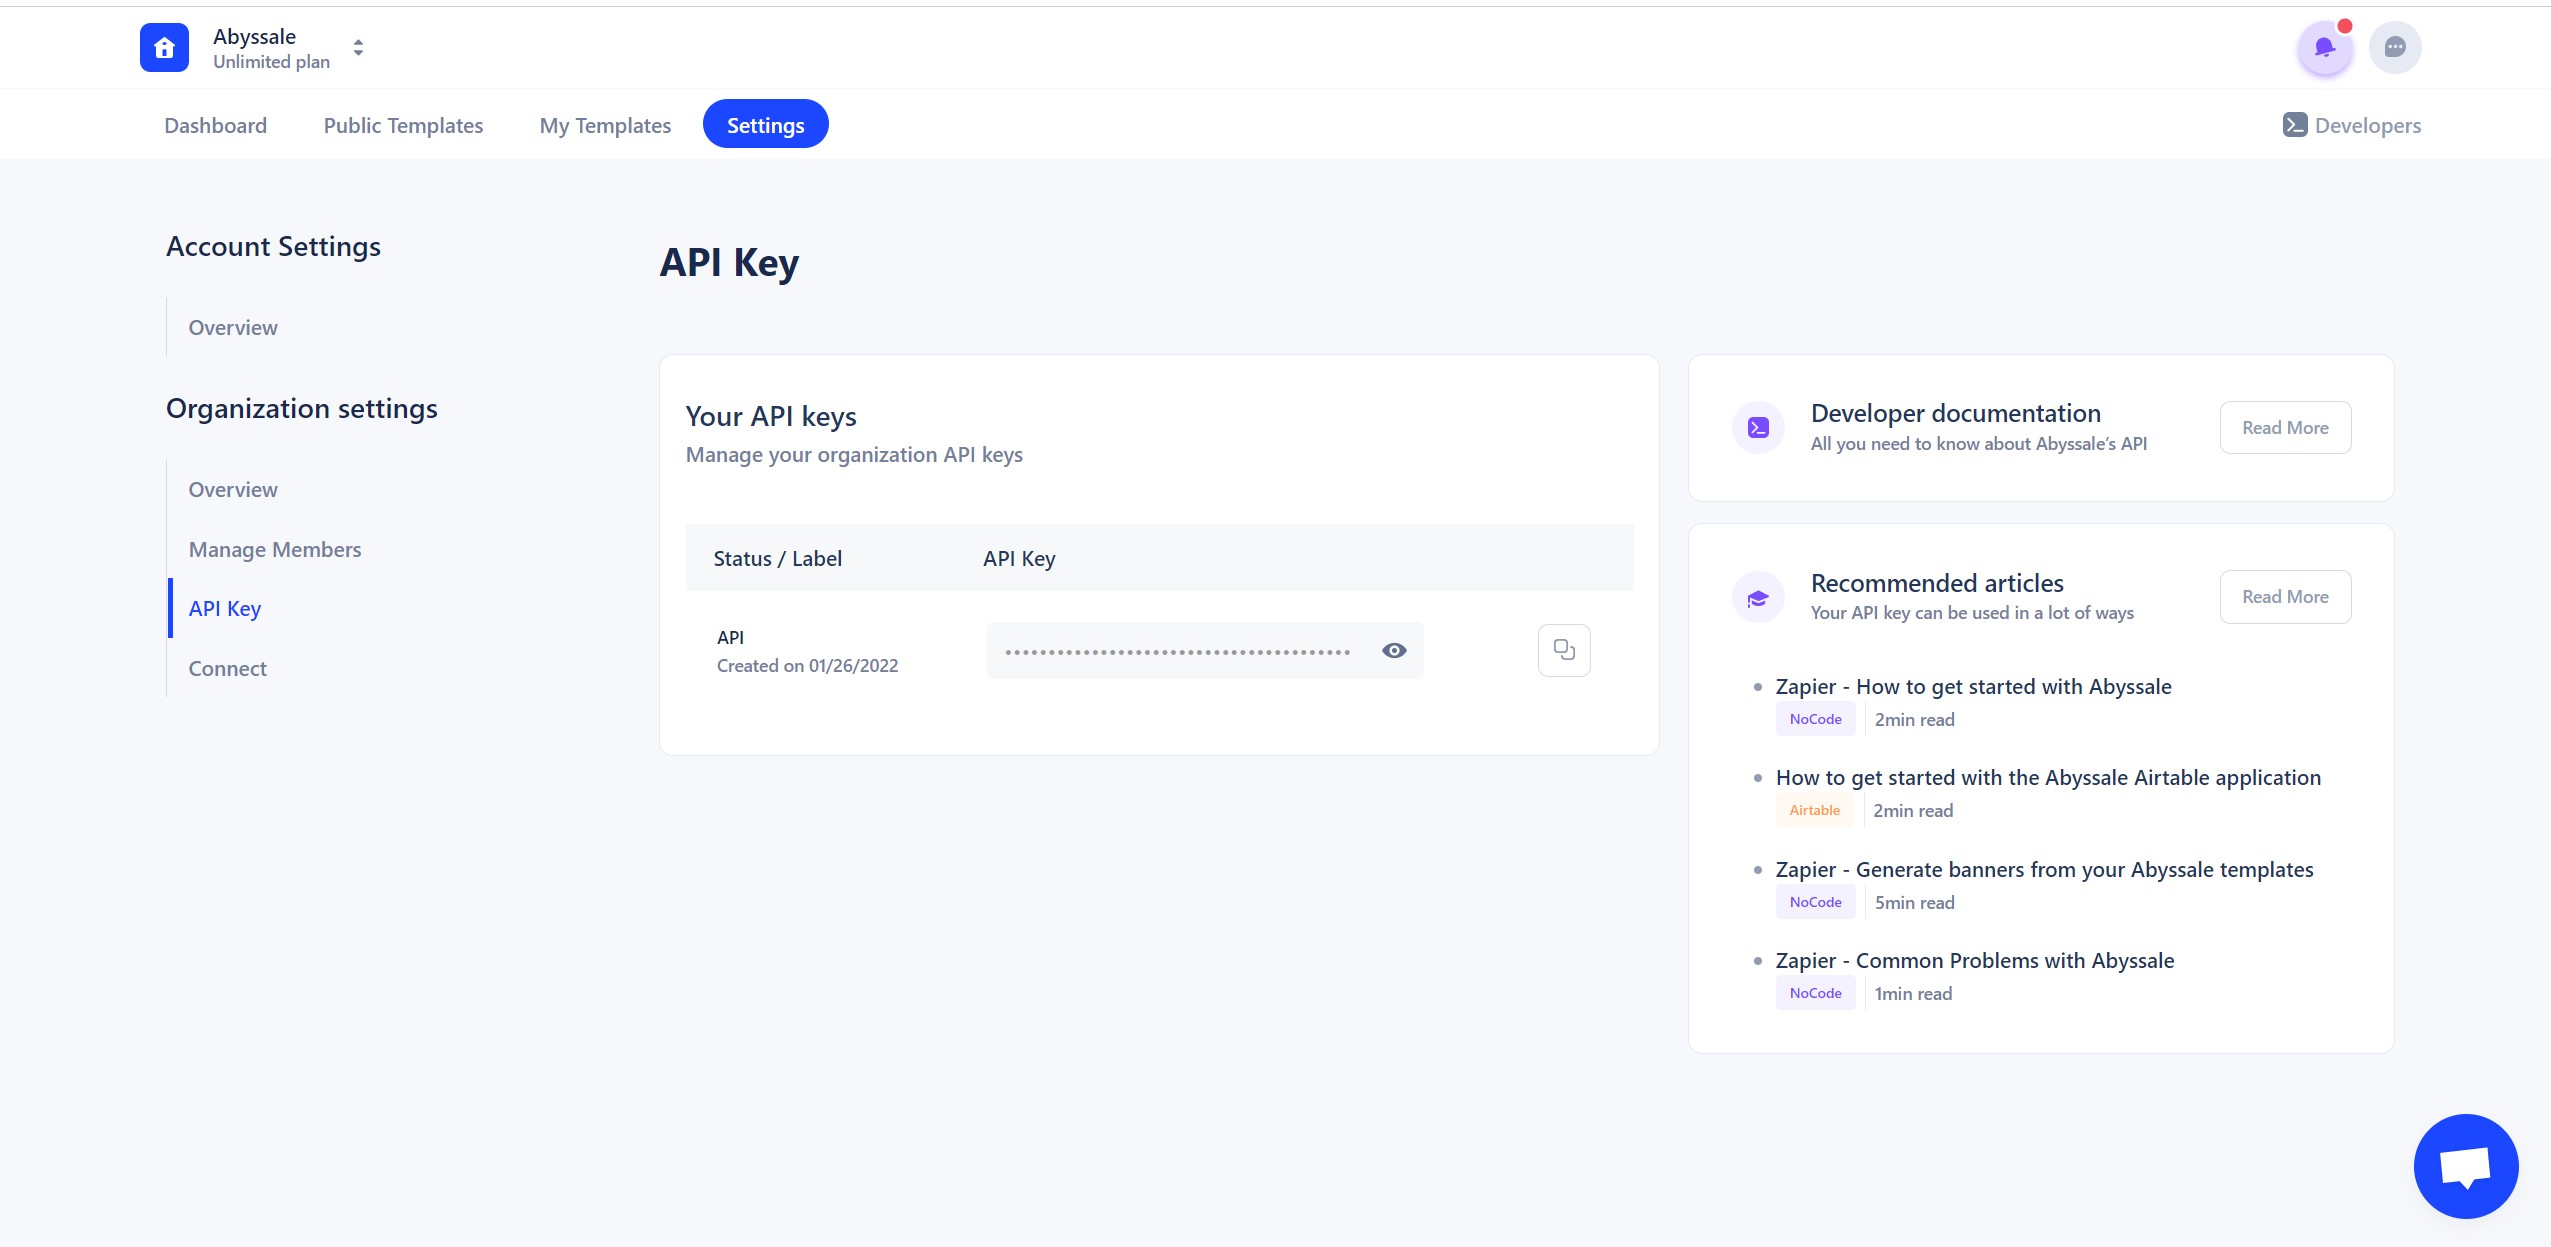
Maintenant, nous devons relier notre Abyssale template à Integromat. Pour connecter Integromat à Abyssale, vous aurez besoin de votre clé API et du nom de votre template. Pour trouver votre clé API, allez dans les paramètres de votre compte Abyssale et cliquez sur "API KEY"vous trouverez votre clé API à copier.
Une fois que c'est fait, Integromat va chercher tous les templates de votre compte, il suffit de choisir celui que vous voulez utiliser. Dans notre cas, rss-to-abyssale-to-instagram.

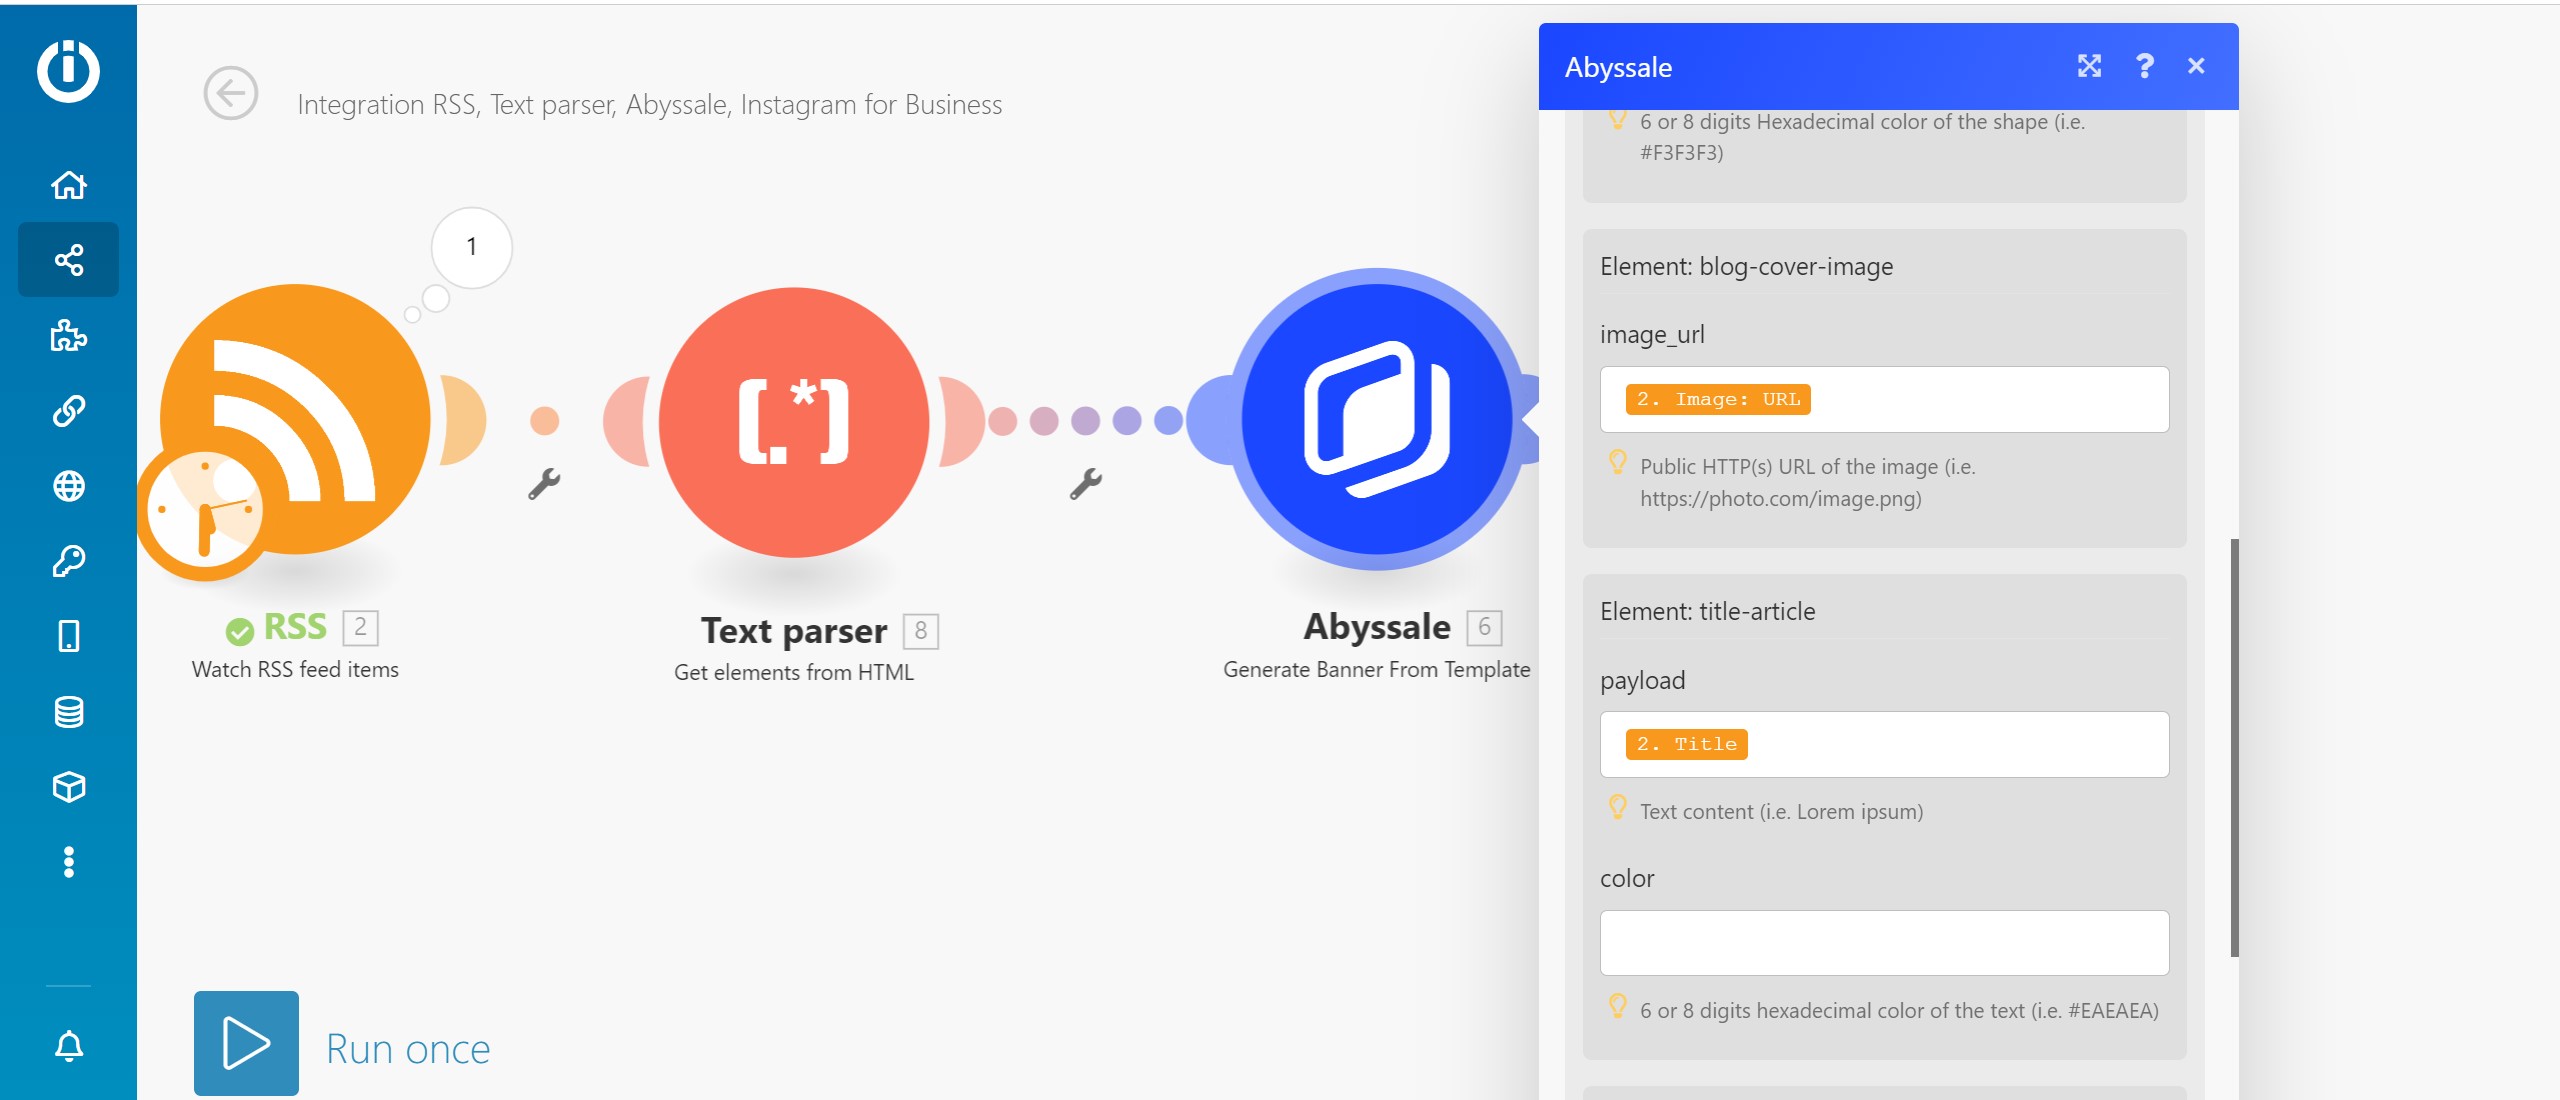
Enfin, nous pouvons faire correspondre les données récupérées dans le premier module de notre scénario avec les couches de notre site Abyssale template . Pour nous, une fois encore, il s'agira de l'image et du titre. C'est là que la façon dont vous avez nommé vos couches pendant la création de template est importante pour que vous sachiez exactement quels éléments faire correspondre avec chaque layer.
#2.4 Ajouter un module Instagram
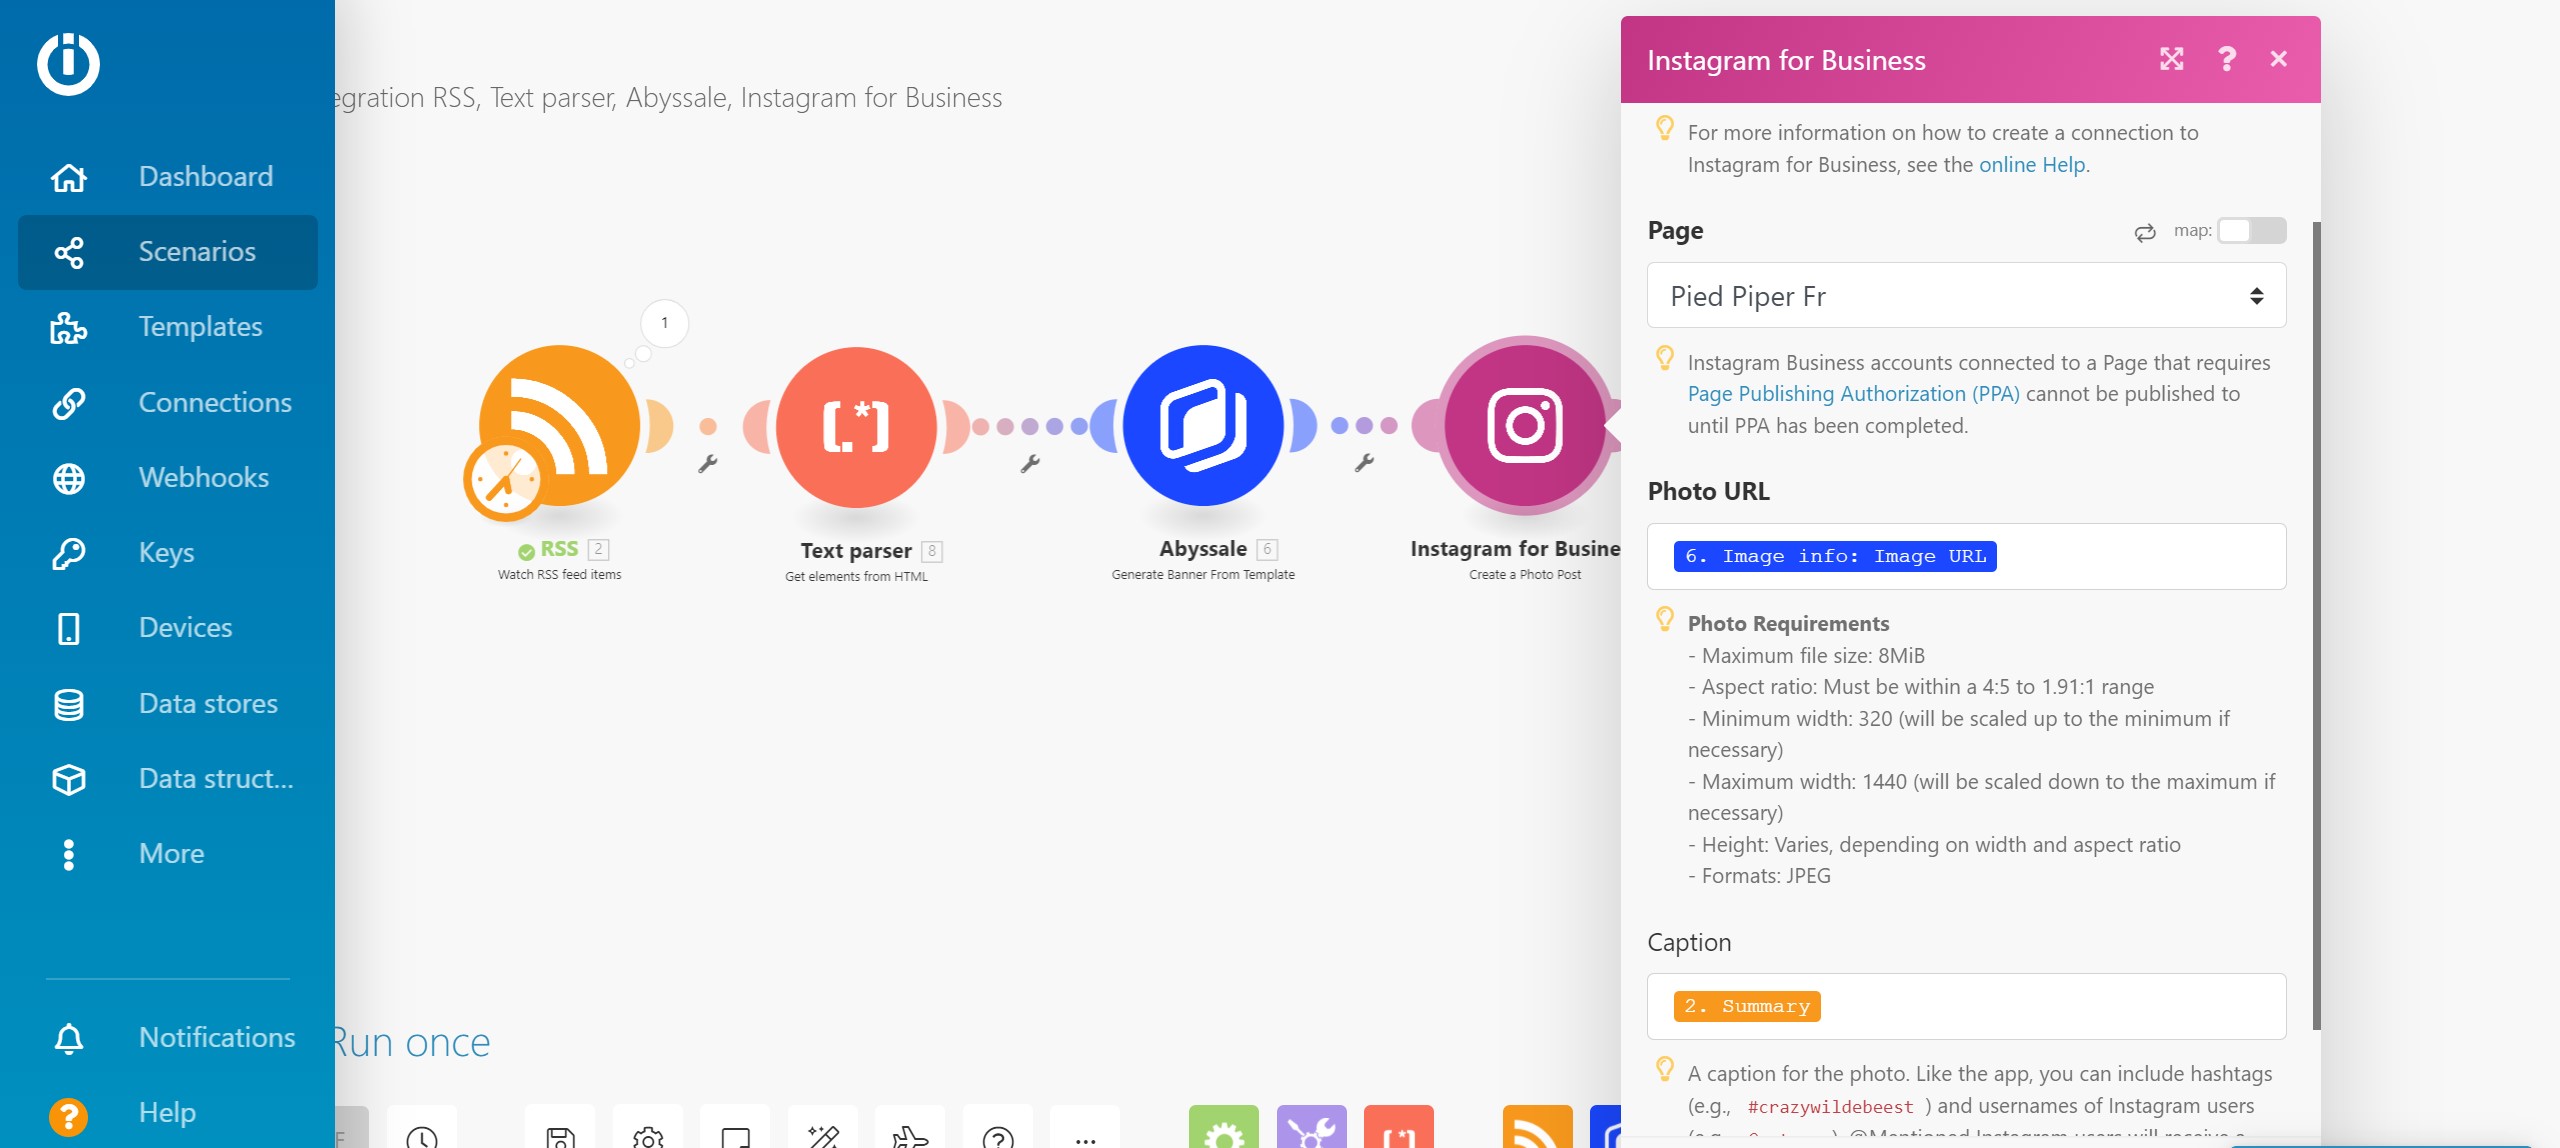
La dernière étape de ce scénario consiste à connecter votre compte Instagram. Ajoutez un module Instagram et connectez votre compte. Encore une fois, nous sélectionnons l'image générée avec Abyssale pour remplir la section "URL de l'image". Pour la section " caption", nous souhaitons que le résumé de notre élément de flux RSS soit utilisé comme description de notre post. Enregistrez, votre template, programmez un intervalle de fonctionnement et voilà ! 🔥
Vous pouvez télécharger le scénario template juste ici pour commencer en quelques secondes ! Suivez ce tutoriel pour apprendre à importer un scénario dans Integromat 😉
Commencez gratuitement
Maître Abyssale's spreadsheet
Explorez nos guides et tutoriels pour exploiter tout le potentiel de la fonction Abyssale's spreadsheet pour la production de contenu à grande échelle.

7 rôles essentiels dans une équipe marketing moderne et comment les faire travailler ensemble efficacement ( Make )
